
Instructions
- Download the Microsoft Visual C++ 2008 installer at http://www.microsoft.com/express/download/#webInstall
- Run the installer and follow the instructions included. (You do not need to install the optional SQL Server 2008 Express).
- Download the OpenGL utility toolkit from http://www.xmission.com/~nate/glut.html
- Extract files from the glut-#.#.#-bin.zip file to a folder on your desktop. (If you do not have an archiver, 7-zip is a good free software package for creating and unzipping archives.)
- Move the file glut.dll into the directory C:/WINDOWS/system32/
- Move the file glut.h into the include directory for Visual Studio 2008. C:/Program Files/Microsoft Visual Studio/VC/include/GL/. (You may need to create the GL folder).
- Move the file glut.lib into the lib directory for Visual Studio 2008. C:/Program Files/Microsoft Visual Studio/VC/lib/.
- In your source code, include glut.h with the preprocessor code: #include "glut.h"
Troubleshooting
If you receive linker errors during compilation, take the following steps:
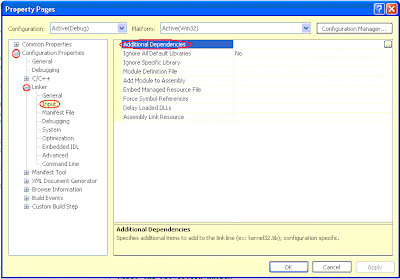
- Add glut.lib to your additional dependencies. Navigate the menus as follows: Project->Properties->Configuration Properties->Linker->Input.
- Enter the text glut.lib into the line labeled "Additional Dependencies."
- Add glut.h to your additional include directories. Navigate the menus as follows: Project->Properties->Configuration Properties->Linker->Input.
- Click the ellipses button on the right hand side of the text field labeled "Additional Include Directories" and locate the glut.h file you downloaded in steps 3 and 4 of setup.


